


Helm is a package manager for Kubernetes applications. It helps us to create packages, install, configure, deploy, and upgrade for the most complex Kubernetes applications. It’s easy to streamline the CI/CD pipeline for workloads as Helm provides an easy and reproducible way to package and distribute Kubernetes applications.
Helm is an open-source project that DeisLabs created and later donated to the Cloud Native Computing Foundation (CNCF). Now CNCF maintains it.
This article explores Helm in-depth, covering its definition, architecture, and installation. It also examines reasons for using Helm, offers a step-by-step guide on Helm Chart usage, discusses the pros and cons of Helm, and explores its integration with Middleware.
What is a Helm Chart in Kubernetes?
Helm uses “charts” to package all the necessary resources and configurations of the application. A Helm chart is like a blueprint for deploying any application on Kubernetes.
It contains all the Kubernetes resource YAML manifest files that are needed to run our application and some helm-related files organized in a specific directory structure. It uses a templating system based on the Go template to render Kubernetes manifests from charts.
In simple words, Helm has some predefined k8s templates where it passes the values that we defined in a file and deploys the resources on the cluster.
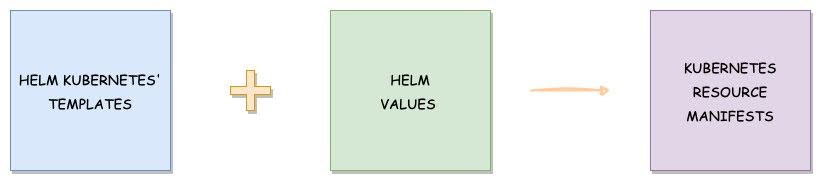
Helm charts make it easier to share and reproduce applications across different Kubernetes clusters.
Helm Installation
There are different ways of installing Helm on our system. Let’s see one by one.
Using Binary Release:
- Download the version you want to install from here.
- Untar it running the command:
tar -zxvf helm-v3.0.0-linux-amd64.tar.gz - Now find the
helmbinary in the unpacked directory, and move it to its desired destination.mv <helm-binary-path> <local-bin-path>
Example: mv linux-amd64/helm /usr/local/bin/helm - Now run the below command to check the version:
helm version
Using Script:
Run the below commands if you want to run through the script, it will install the latest version.
 curl -fsSL -o get_helm.sh  https://raw.githubusercontent.com/helm/helm/main/scripts/get-helm-3

chmod 700 get_helm.sh

./get_helm.sh
Using Package Manager:
We can also install Helm using different package managers such as homebrew, yum, etc. Check out the official documentation for more details.
Helm Architecture
Helm is built on a modular architecture that comprises two main components: the Helm Client and the Helm Library.
- Helm Client: The Helm CLI is a command-line interface built on Kubernetes’ client-go library. It is the user’s gateway to interact with Helm. It enables users to create new charts, manage repositories, and release packages.
- Helm Library: The Helm library is a core engine that is used by clients to interact with the Kubernetes API server to install, upgrade, or roll back charts and to perform other Helm operations.

In older Helm versions, Tiller, a server-side component, was responsible for establishing the interaction between the client and the Kubernetes API server and for managing releases on the Kubernetes cluster.
However, as of Helm v3, in favor of a client-only architecture, Tiller has been deprecated. Helm now interacts directly with the Kubernetes API server. This change enhances security and simplifies Helm’s architecture.
Why should you use Helm?
Below are some reasons why you should use Helm:
1. Simplified Application Deployment:
- Problem: Deploying complex Kubernetes applications can be unsettling and error-prone.
- Solution: Helm makes it easier to define, install, and upgrade. Helm allows you to package applications into a single chart, making it easier to manage and deploy.
2. Version Control for Deployments:
- Problem: Challenge in managing different versions of an application across environments.
- Solution: Helm Charts enables versioning. It helps you to track your application deployments.
3. Template-based Configuration:
- Problem: Inconsistencies and mistakes while configuring applications for different environments.
- Solution: Helm’s templating helps you to define configuration values easily and customize application resources for different environments.
4. Dependency Management:
- Problem: Dependency of multiple components or resources that need to be deployed together.
- Solution: A key feature of Helm is its ability to manage dependencies between different chart packages. Helm charts ensure that all components are configured and deployed correctly.
5. Collaboration and Reusability:
- Problem: The challenge in sharing and replicating application configurations across projects.
- Solution: Helm Charts can be shared and reused. It makes it easier for teams to collaborate and maintain consistency.
6. Rollback and Upgradability:
- Problem: Updating applications without a clear rollback strategy can lead to downtime or critical issues.
- Solution: Helm allows you to upgrade and rollback your application to a specific version. It reduces the risk of downtime and ensures continuous availability.
Helm Chart Structure
Let’s create a chart by running the helm create command to understand the Helm chart.
helm create test-chartCreating test-chart
Here we created a chart named test-chart. A directory called test-chart will automatically get created and can be checked by running the ls command. Now you can go through the directory and check the files inside it.
Run the tree command to check the structure:
 tree test-chart/
test-chart/
├── Chart.yaml
├── charts
├── templates
│   ├── NOTES.txt
│   ├── _helpers.tpl
│   ├── deployment.yaml
│   ├── hpa.yaml
│   ├── ingress.yaml
│   ├── service.yaml
│   ├── serviceaccount.yaml
│   └── tests
│       └── test-connection.yaml
└── values.yaml
4 directories, 10 files
Let’s look at each file and directory inside a helm chart and understand its importance.
- .helmignore: It’s a hidden file that’s why we’re not able to see it in the chart structure. Run the ls -a command from inside the directory to check it out. It is used to define all the files that we don’t want to include in the helm chart.
- Chart.yaml: It contains the basic information about the chart.
- charts: It’s an empty directory. We can add any chart’s structure here on which our main chart depends.
- templates: It’s a directory that contains all the Kubernetes manifest files that build an application. By default, helm created deployment.yaml, service.yaml, hpa.yaml, ingress.yaml, serviceaccount.yaml manifest files. We can modify and override these files as per our needs. We can even add other Kubernetes object’s manifest files. These manifest files can be templated to access values from values.yaml file.
- templates/NOTES.txt: This is a plaintext file that gets printed out after the chart is successfully deployed.
- templates/_helpers.tpl: That file contains several methods and sub-template. It helps keep our charts organized and avoids repeating the same code in multiple places.
- templates/tests/: We can define tests here in our charts to validate that our chart works as expected when it is installed.
- values.yaml: This file contains the values for the manifest files in the templates directory. For example, image name, replica count, HPA values, etc. We can create different values.yaml files based on the environments and change the values.
Helm Chart Tutorial: A step-by-step guide
Let’s see an example and deploy a chart on our own. We will go deep dive into the Helm structure directories and files. We will modify the chart that we created in the previous step. Let’s check the files and edit them one by one whatever is required.
Chart.yaml
As we know, we mention all the information related to the chart in this file such as the name and type of the chart, some description of the chart, versions, and all.
apiVersion: v2

name: test-chart

description: Test Helm Chart For Tutorial

type: application

version: 0.1.0

appVersion: "1.0.0"
Let’s see each field one by one:
- apiVersion: It refers to the chart API version. v2 is the current apiVersion for the Helm 3 version.
- name: This field refers to the name of the chart.
- description: A one-liner detail about the helm chart.
- Type: There are 2 chart-type options: application and library. Type application refers to the charts that we deploy on Kubernetes. Type library refers to the charts that are reusable and can be used with other charts.
- Version: It refers to the version of our chart.
- appVersion: It describes the version number of our application.
There are some other fields also like maintainers, dependencies, icons, etc.
templates
We talked earlier about the templates folder, which contains templated Kubernetes manifest files of some common resources. But, we may need some other resources in our application, which we’ll have to create as templates. We can also remove the resources which we don’t need.
For now, we’ll use 2 resources: deployment and service. So let’s remove other files and folders. Our folder will look like this:
1 directory, 3files
We can also remove or add the fields in the manifest file according to our needs. So our deployment.yaml and service.yaml will look like this:
deployment.yaml
 apiVersion: apps/v1
 kind:  Deployment
 metadata:
 name: {{ include "test-chart.fullname" . }}
 labels:
   {{- include "test-chart.labels" . | nindent 4 }}
spec:
 replicas: {{ .Values.replicaCount }}
 selector:
   matchLabels:
     {{- include "test-chart.selectorLabels" . | nindent 6 }}
 template:
   metadata:
     {{- with .Values.podAnnotations }}
     annotations:
       {{- toYaml . | nindent 8 }}
     {{- end }}
     labels:
       {{- include "test-chart.selectorLabels" . | nindent 8 }}
   spec:
     containers:
       - name: {{ .Chart.Name }}
         image: "{{ .Values.image.repository }}:{{ .Values.image.tag | default .Chart.AppVersion }}"
         imagePullPolicy: {{ .Values.image.pullPolicy }}
         ports:
           - name: http
             containerPort: 80
             protocol: TCP
Service.yaml
 apiVersion: v1
kind:  Service
metadata:
 name: {{ include "test-chart.fullname" . }}
 labels:
   {{- include "test-chart.labels" . | nindent 4 }}
spec:
 type: {{ .Values.service.type }}
 ports:
   - port: {{ .Values.service.port }}
     targetPort: {{ .Values.service.targetPort }}
     protocol: TCP
     name: {{ .Values.service.name }}
 selector:
   {{- include "test-chart.selectorLabels" . | nindent 4 }}
We template the Kubernetes object manifest files so that we can reuse them in multiple environments by dynamically assigning values to them using each environment’s values file. Let’s understand these templates.
Helm uses template directive, where we provide the object-parameter inside the curly brackets.
{{ .Object.Parameter }}There are different objects we can use. In our templates, we’re using Chart and Values. We mention the Chart object for using the parameters defined in the Chart.yaml and the Values object for values.yaml.
For example, in deployment.yaml file:
For the snippet {{ .Values.replicaCount }}, Helm will check the values.yaml file, find the replicaCount parameter, take the value of it, and render in deployment.yaml file. Similarly for snippet {{ .Chart.Name }}, it will check the Chart.yaml file, find the Name parameter, and get the value of it.
We can also see a snippet {{ include “test-chart.fullname” . }}, here we used the include keyword. Using it we ask Helm to check the _helpers.tpl file where some default templates are defined and get the value from there. So it will check for test-chart.fullname and get the value as per the definition there.
Values.yaml
The values.yaml file is a configuration file used to set default values for various parameters. All the values in this file get substituted in the template directives we used in the templates.
The file is structured as key-value pairs, where the key notates the Kubernetes object’s field. Let’s replace the default values.yaml content with the following.
 replicaCount:  2
 image:
 repository: nginx
 tag: "1.25.3"
 pullPolicy: Always

service:
 name: nginx-service
 type: ClusterIP
 port: 80
 targetPort: 8080
Here, we’re using only one values.yaml file, for example. We can have several values files based on environments.
Suppose we have 4 environments in our project: dev, qa, uat, prod. We can name these as values-dev.yaml, values-qa.yaml, values-uat.yaml and values-prod.yaml.
Now, using these different files, we can customize our values as per the environment’s needs. For example, We may need more pod replicas in uat and prod environments so we can change the value of replicaCount in the respected files.
At installation time, we can pass the file name in the command. The object’s template will then take the values accordingly and get deployed in the cluster.
Validate the Helm Chart
To validate our helm charts before the actual deployment, helm provides multiple commands. Using these commands, we can check that all the things are in-place and correct.
1. helm lint:
This command runs a series of tests to verify that the chart is valid and all the indentations are fine. It will throw the errors in case of any issues in the charts.
Let’s run this command against our chart.
➜  helm lint test-chart/

==> Linting test-chart/

[INFO] Chart.yaml: icon is recommended

1 chart(s) linted, 0 chart(s) failed
We can see that it successfully ran and there are no errors in our chart.
2. helm template:
This command checks that the values are getting substituted in the templates. It will generate and display all the manifest files with the substituted values.
If you run this command, you’ll get the below output.
# Source: test-chart/templates/service.yaml
apiVersion: v1
kind: Service
metadata:
 name: release-name-test-chart
 labels:
   helm.sh/chart: test-chart-0.1.0
   app.kubernetes.io/name: test-chart
   app.kubernetes.io/instance: release-name
   app.kubernetes.io/version: "1.0.0"
   app.kubernetes.io/managed-by: Helm
spec:
 type: ClusterIP
 ports:
   - port: 80
     targetPort: 8080
     protocol: TCP
     name: nginx-service
 selector:
   app.kubernetes.io/name: test-chart
   app.kubernetes.io/instance: release-name
---
# Source: test-chart/templates/deployment.yaml
apiVersion: apps/v1
kind: Deployment
metadata:
 name: release-name-test-chart
 labels:
   helm.sh/chart: test-chart-0.1.0
   app.kubernetes.io/name: test-chart
   app.kubernetes.io/instance: release-name
   app.kubernetes.io/version: "1.0.0"
   app.kubernetes.io/managed-by: Helm
spec:
 replicas: 2
 selector:
   matchLabels:
     app.kubernetes.io/name: test-chart
     app.kubernetes.io/instance: release-name
 template:
   metadata:
     labels:
       app.kubernetes.io/name: test-chart
       app.kubernetes.io/instance: release-name
   spec:
     containers:
       - name: test-chart
         image: "nginx:1.25.3"
         imagePullPolicy: Always
         ports:
           - name: http
             containerPort: 80
             protocol: TCP
At the time of deployment, the release-name will get overridden by the release name we will provide via the helm command.
3. helm install — dry-run:
This command dry-runs the installation of the manifests and checks that all the templates are working fine. In case of any issues, it will throw the errors. If everything is good, then you will see the manifest output that would get deployed into the cluster.
helm install --dry-run <release-name> <chart-name>Deploy the Helm Chart
To deploy a helm chart, we use the helm install command.
The above command will consider the default values.yaml file. If you want to change it use the below command.
Now let’s deploy our chart. You’ll get the below output.
helm install nginx test-chart/ -f test-chart/values.yaml


NAME: nginx
LAST DEPLOYED: Fri Jan 26 13:15:45 2024
NAMESPACE: default
STATUS: deployed
REVISION: 1
TEST SUITE: Non
We can also provide the namespace using the -n option.
To get the chart releases, we can use the helm list command.
helm list
| NAME | NAMESPACE | REVISION | UPDATED | STATUS | CHART | APP VERSION |
| nginx | default | 1 | 2024-01-26 13:15:48.399430207 +0000 UTC | deployed | test-chart-0.1.0 | 1.0.0 |
Now as the chart is deployed, let’s see the Kubernetes resources that we have deployed via the chart.
➜ kubectl get deployments
| NAME | READY | UP-TO-DATE | AVAILABLE | AGE |
| nginx-test-chart | 2/2 | 2 | 2 | 3m23s |
➜ kubectl get services
| NAME | TYPE | CLUSTER-IP | EXTERNAL-IP | PORT(S) | AGE |
| kubernetes | ClusterIP | 10.96.0.1 | <none> | 443/TCP | 99m |
| nginx-test-chart | ClusterIP | 10.110.143.13 | <none> | 80/TCP | 3m29s |
➜ kubectl get pods
| NAME | READY | STATUS | RESTARTS | AGE |
| nginx-test-chart-76cfd7666d-dxw9j | 1/1 | Running | 0 | 3m33s |
| nginx-test-chart-76cfd7666d-gxqx4 | 1/1 | Running | 0 | 3m33s |
➜ kubectl describe pod nginx-test-chart-76cfd7666d-dxw9j | grep image
Normal  Pulling    47s   kubelet   Pulling image "nginx:1.25.3"

Normal  Pulled     31s   kubelet    Successfully pulled image "nginx:1.25.3" in 15.913s
We can see that Helm added the release name in the name of deployment and service. You can also check the deployment and service manifests by describing them.
Upgrade the Helm Chart
To modify the chart and install the updated version, we can use the helm upgrade command.
With a specific values.yaml file:
Suppose we need to change the image of the application. We will use nginx:1.19.9 instead of the current version. So let’s change the image in values.yaml file.
replicaCount: 2
image:
 repository: nginx
 tag: "1.19.9"
 pullPolicy: Always
service:
 name: nginx-service
 type: ClusterIP
 port: 80
 targetPort: 8080
Now let’s upgrade our chart.
➜ helm upgrade nginx test-chart/ -f test-chart/values.yaml
Release "nginx" has been upgraded. Happy Helming!
NAME: nginx
LAST DEPLOYED: Fri Jan 26 13:19:45 2024
NAMESPACE: default
STATUS: deployed
REVISION: 2
TEST SUITE: None
➜ helm list
| NAME | NAMESPACE | REVISION | UPDATED | STATUS | CHART | APP VERSION |
| nginx | default | 2 | 2024-01-26 13:19:45.399430207 +0000 UTC | deployed | test-chart-0.1.0 | 1.0.0 |
Now you can see that our chart has been upgraded and REVISION 2 is running.
To verify the changes, let’s check the pod image again.
➜ kubectl get pods
| NAME | READY | STATUS | RESTARTS | AGE |
| nginx-test-chart-7467f4dc9-hztzl | 1/1 | Running | 0 | 3m56s |
| nginx-test-chart-7467f4dc9-rbppf | 1/1 | Running | 0 | 4m2s |
➜ kubectl describe pod nginx-test-chart-7467f4dc9-hztzl | grep image
Normal  Pulling    4m11s  kubelet            Pulling image "nginx:1.19.9"

Normal  Pulled     4m11s  kubelet            Successfully pulled image "nginx:1.19.9" in 515ms (515ms including waiting)
We can see that the pods are running with the new image nginx:1.19.9
Rollback the Helm Chart
To rollback the changes, use the helm rollback command:
Rollback to the specific version:
Now let’s roll back our changes to the chart that we made in the last step.
➜ helm rollback nginx
Rollback was a success! Happy Helming!
➜ helm list
| NAME | NAMESPACE | REVISION | UPDATED | STATUS | CHART | APP VERSION |
| nginx | default | 3 | 2024-01-26 13:25:53.289826954 +0000 UTC | deployed | test-chart-0.1.0 | 1.0.0 |
We can see that the Rollback is successful and the new REVISION 3 is running. That means that Helm takes the rollback as a new revision.
Now again verify the changes whether they get rollbacked or not:
➜ kubectl get pods
| NAME | READY | STATUS | RESTARTS | AGE |
| nginx-test-chart-76cfd7666d-dscdw | 1/1 | Running | 0 | 7s |
| nginx-test-chart-76cfd7666d-l75ts | 1/1 | Running | 0 | 9s |
➜ kubectl describe pod nginx-test-chart-76cfd7666d-dscdw | grep image
Normal  Pulling    22s   kubelet            Pulling image "nginx:1.25.3"

Normal  Pulled     21s   kubelet            Successfully pulled image "nginx:1.25.3" in 316ms (316ms including waiting)
We can see the new pods are running with the older image only.
Uninstall the Helm Chart
To uninstall the helm release we can use the helm uninstall command. It will remove all of the resources associated with the last release of the chart
Let’s uninstall our chart.
➜ helm uninstall nginx
release “nginx” uninstalled
Now if you check the deployment, service, and pods, all the resources will get removed by the Helm.
Package the Helm Chart
As we know we can share our charts with others so that they can install and use them. To distribute the charts with others we need to package the charts. Below is the command for the same, it creates a versioned archive file of the chart.
Now we can share the archive with others manually or upload it to any public/private chart repositories.
Pros and Cons of using Helm
Pros
- Helm provides advanced features like hooks and release management and simplifies complex Kubernetes deployments, reducing errors and ensuring consistency. It increases the speed of deployments.
- Helm has a large collection of pre-built charts that can be easily shared and reused. It also has pre-built charts for popular applications.
- Helm charts promote code reuse and version control for applications.
- Helm’s release-centric approach facilitates easy upgrades, rollbacks, and uninstallation, essential for error recovery.
- Facilitates DevOps practices and concurrent deployments.
- It helps us streamline our CI/CD pipelines.
Cons
- Helm has complex templating and it needs to be set up separately.
- Helm is not well-suited to projects where a single container needs to be deployed on a server.
- Over-reliance on community components.
- Helm introduces a learning curve, especially for users new to Kubernetes.
- A project with multiple microservices, each with its dependencies, might encounter challenges when coordinating versions and ensuring compatibility across the entire stack.
Top 8 Helm Charts Best Practices
- Break down your charts into smaller, reusable modules for easier management and increased flexibility.
- Always version your Helm charts to track changes, enable easy rollbacks, and maintain a clear release history.
- We should increment the version and appVersion each time we make changes to the application.
- Use lowercase for the chart name and field name in values.yaml file.
- Always provide clear and concise documentation within your charts to ensure maintainable Helm charts.
- Name the Kubernetes manifest files after the Kind of object i.e. deployment.yaml, service.yaml, etc.
- Use Helm linting tools to catch issues early.
- Use the Helm community to leverage existing charts.
Conclusion
To sum it up, Helm charts are very useful for deploying and managing applications on Kubernetes. This tutorial walked you through everything from the core components of Helm to creating and deploying the Helm charts.
We also discussed the pros and cons of using Helm and some best practices. When we have a lot of environments where customization is needed for the deployments, helm templating is perfect for Kubernetes resources.
By using Helm charts, we simplify the whole process, making it easier for teams to work together and ensuring our apps run smoothly no matter where they’re deployed.
FAQ:
What is a Helm library chart?
Helm library chart is like a handy kit that holds useful tools for building Helm charts. It contains reusable templates and resources that can be shared across multiple charts.
It helps to keep our projects neat, organized, and consistent and promotes efficiency and consistency in managing Kubernetes deployments.
Where are Helm charts stored?
Helm charts are stored in repositories. These repositories can be public or private. There is a public repository for Helm where we can store our charts. We can even host private repositories in our own infrastructure or cloud storage solutions.