
The Kubernetes command-line tool, `kubectl`, though extremely helpful, offers numerous commands with many options. Searching for the right command or syntax can be like finding a needle in a haystack.
That’s why we have compiled 12 essential `kubectl` commands with code examples in this article to help you streamline your Kubernetes management tasks.
🔍Monitor, manage, and troubleshoot your Kubernetes clusters with Middleware’s unified dashboard. Get started free
What is kubectl?
Kubectl is a command-line tool for controlling and interacting with Kubernetes clusters via the control plane. The Kubernetes cluster consists of two important planes: the control plane, which runs the Kubernetes components, and the workloads and machines that run on the control plane components, nodes and their components.
The components of the Kubernetes control plane include the kube-scheduler, etcd, kube-controller-manager, cloud-controller-manager, container runtime and kube-apiserver (which exposes the Kubernetes API to kubectl).
Kubectl controls the Kubernetes cluster control plane and functions as a client of the Kubernetes API server. The API is RESTful and HTTP-based. To run Kubernetes, Kubectl must send HTTP requests to the Kubernetes API.
As a result, kubectl controls the Kubernetes cluster control plane and, therefore, functions as a client of the Kubernetes API server.
The API is RESTful and HTTP-based. To run Kubernetes, Kubectl must send HTTP requests to the Kubernetes API.
To establish the connection to the API server, Kubectl uses the cluster’s kubeconfig file, which contains the required authentication and cluster details.
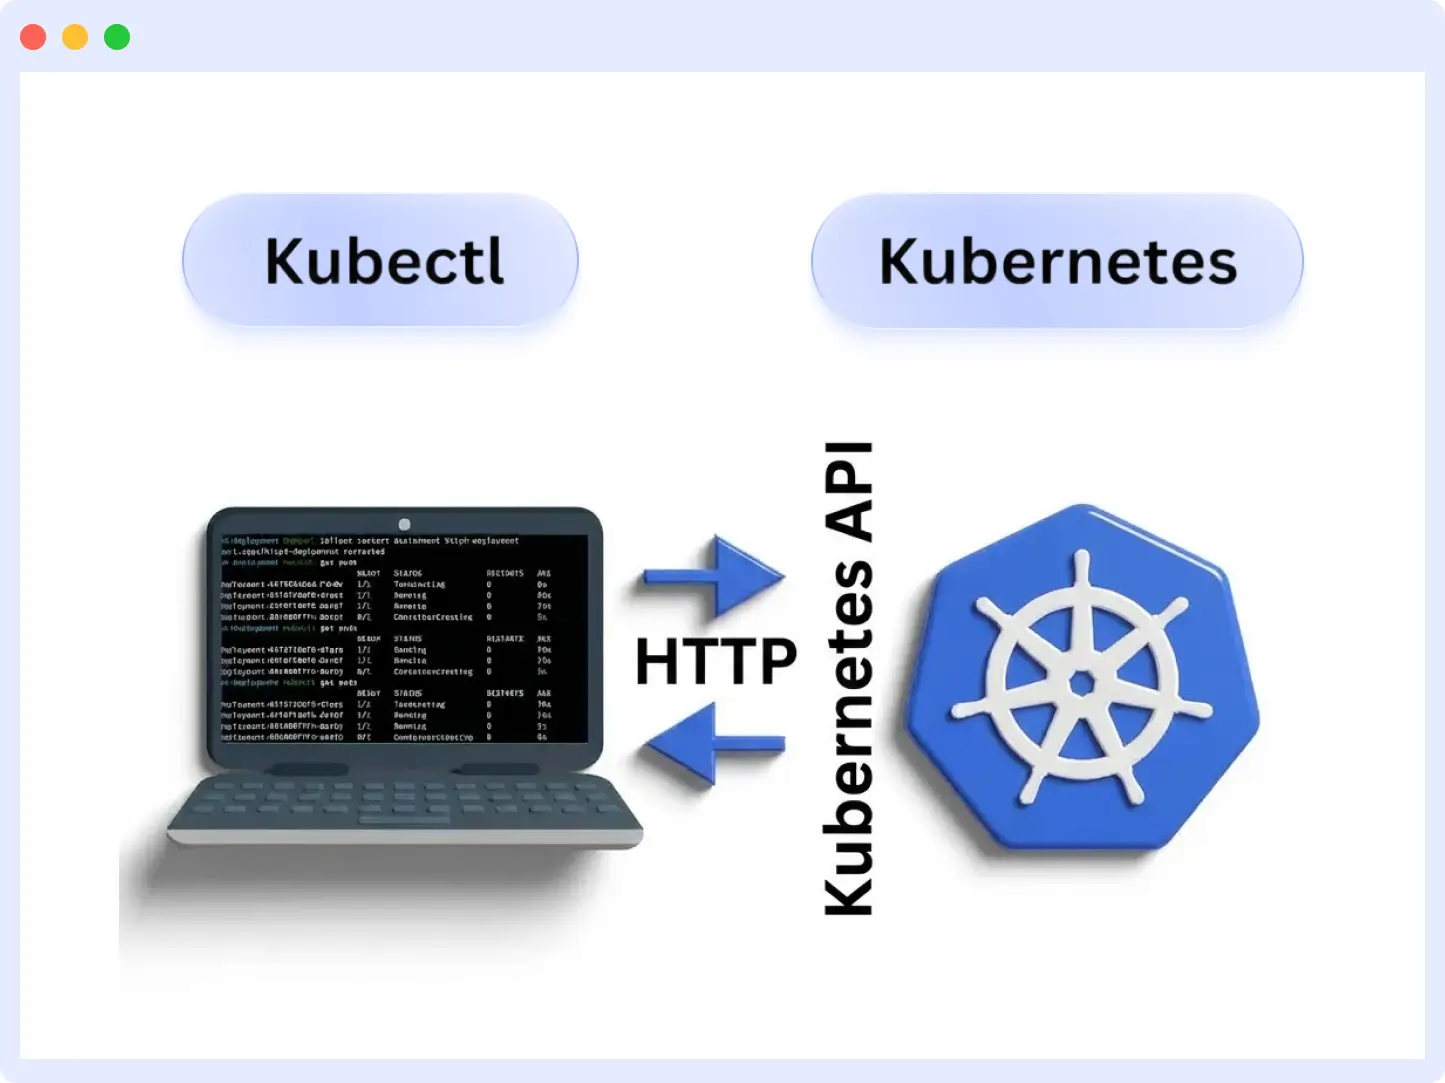
Based on a request from kubectl, the API first authenticates the request and then configures data for the target resource type or API object, such as Pods, replication controllers, the controller manager, the scheduler, and Services.
In essence, therefore, Kubernetes is managed through kubectl, which consequently sends requests to the Kubernetes API to validate and execute create, read, update, and delete (CRUD) operations on Kubernetes resources.
For example, you can create ReplicaSets with predefined resource definitions by using kubectl (kubectl create -f replicaset.yaml) to send an HTTP request to the Kubernetes API.
Once a request is received, the API sequentially communicates with the storage backend (to store the resource definitions), the replication controller (to create the required Pods), and the scheduler (to assign these Pods to their corresponding nodes).
Kubectl provides a wide range of functionality for managing different Kubernetes resources—nodes, pods, services, deployments, namespaces. These functionalities include creating, deleting, updating, and getting information about these resources. It supports multiple command-line options and flags to customize operations.
Quick Notes on Syntax
The syntax is the function of a code line and the order in which it is arranged. The syntax for running the “kubectl” command line interface is:
kubectl [command] [TYPE] [NAME] [flags]
The following is a brief explanation of their functionalities:
Command
Command represents the action you want to perform on a Kubernetes resource. These are CRUD operations: create, get, describe, delete, apply, etc. It is usually the first part of the `kubectl` command-line statement. For example, in the command `kubectl get pods`, the verb “get” instructs kubectl to retrieve information about pods.
Type
The type specifies the Kubernetes resource on which you want to run the command. Common resource types include pods, services, deployments, namespaces, and replica sets. In the command `kubectl describe pod my-pod`, the type is “pod”, since you want to describe a specific pod named “my-pod”.
Type is case-insensitive; you can use uppercase or lowercase. You can also indicate the number of the specific object type that you want to perform an operation on (e.g `kubectl create pod` or `kubectl create pods`).
Additionally, you can perform a command operation on multiple resource types simultaneously. Do this by specifying each resource type, then the target resource name. For example, `kubectl create pod/my-pod replicationcontroller/myrc1`.
Name
The name refers to the unique identifier of the Kubernetes resource you want to target with the command. It is usually provided after the resource type is specified.
In the command `kubectl delete pod my-pod`, “my-pod” is the name of the pod you want to delete. Unlike types, names are case-sensitive; you may have a pod named “Pod 1” and another named “pod 1”. So consider the appropriate case when specifying the resource name.
In addition, you can omit the resource name if you do not have multiple files or versions of the resource type, or you want the command to be carried out on all files in the target resource type.
You can also perform commands on multiple files simultaneously. Do this by grouping the resources and specifying the names of all files you are targeting. For instance, `kubectl describe pod my-pod1 my-pod2 my-pod3`.
Flags
Flags are additional parameters that modify or customize the behavior of the kubectl command. Also known as options or switches, they are preceded by one or two dashes (that is, `-` or `–`). Flags provide additional functionality, such as specifying a namespace, setting output formats, and filtering resources.
Commonly used flags include:
- `-n` or `–namespace`: specifies the namespace in which the operation should be performed.
- `–kubeconfig`: Specifies the path to the kubeconfig file used to authenticate and communicate with the cluster.
- `–context`: Selects a specific context within the kubeconfig file.
- `–selector`: Filters resources based on labels or other selectors.
Flags can be assigned values using the equal sign (`=`). For example, `–replicas=3` sets the number of replicas to 3 when scaling a deployment.
12 Kubectl commands with examples
The following are 12 core `kubectl` commands and their options, with code examples for each as they relate to Nodes, Pods, Namespaces, Services, Deployments, DaemonSets, Events, Logs, ReplicaSets, Service Accounts, Cluster Introspection, and Interacting with Deployments and Services.
🧰 To explore the most effective monitoring tools and how they integrate with kubectl workflows, see our Kubernetes Monitoring Tools deep dive.
Kubernetes Nodes
Nodes are physical or virtual worker machines in the Kubernetes cluster. Nodes host and run Pods and their components (containers). Each cluster contains at least one node that comprises the kubelet, kube-proxy, and a container runtime.
⚡ Monitor Your Nodes in Real-Time: Keep track of node resource usage, health, and scheduling directly from Middleware. Try it free
Now that you understand what nodes are, let’s take a closer look at some commonly used kubectl commands that are specifically directed at node management and inspection.
- kubectl get node: Retrieves information about and displays a list of all the nodes in the cluster.
First and foremost, you can retrieve basic information about all nodes in the cluster using the following command:
As a result, kubectl displays a list of nodes, including their current status, roles, age, and Kubernetes version.
For example, the output might look like this:
NAME     STATUS   ROLES    AGE   VERSION
node-1       Ready    <none>   10d      v1.28.3
node-2       Ready    <none>   10d      v1.28.3
node-3       Ready    <none>   10d      v1.28.3
- kubectl delete node <node_name>: Deletes a specific node from the cluster, resulting in the rescheduling of the affected pods to other available nodes.
- kubectl top node: To monitor performance, Kubernetes provides a
kubectl top nodecommand, which displays real-time resource usage statistics such as CPU and memory consumption.
A result might look like this:
NAME   CPU(cores)    CPU%     MEMORY(bytes)   MEMORY%

node-1   5m            0%        123Mi        16%

node-2    8m           1%.       291Mi         38%

node-3 2m 0% 90Mi 12%- kubectl describe nodes | grep ALLOCATED -A 5: Provides detailed information about all nodes in the cluster, with specific focus on allocated resources and the pods running on each node. The `grep` command filters the output to display information related to allocated resources.
- kubectl get pods -o wide | grep <node_name>: Retrieves information about pods that are running on a specific node. The `grep` command is used to filter the output and display only the pods running on the specified node.
- kubectl get no -o wide: Provides detailed information such as IP addresses and roles about all nodes in the cluster, in a wide format.
- kubectl describe no: Provides detailed information about all nodes in the cluster, including the node conditions, system details, and other relevant information.
A result can look like this:
Name:               node-1
Roles:              <none>
Labels:             beta.kubernetes.io/arch=amd64
                    beta.kubernetes.io/os=linux
                    kubernetes.io/arch=amd64
                    kubernetes.io/hostname=node-1
                    kubernetes.io/os=linux
Annotations:        node.alpha.kubernetes.io/ttl=0
- kubectl annotate node <node_name>: Adds or updates annotations on a specific node. Annotations are key-value pairs that provide arbitrary, non-identifying metadata about a node.
Information provided in annotations includes labels or indicators for logging and monitoring repositories; build, release, and image information (such as release IDs, timestamps, and image hashes); and debugging information (such as client library names, builds, and versions).
- kubectl uncordon node <node_name>: This command marks a previously cordoned node as schedulable again. When a node is cordoned, it is marked unschedulable, and no new pods can be scheduled on it.
Pods already running on the cordoned node will remain accessible. To check which nodes are cordoned off at a specific time, apply the get nodes command.
Once ‘uncordoned’, new Pods can be scheduled to a node. To uncordon, use this command:
- kubectl label node: This command adds, updates, or removes labels on nodes. Labels are key-value pairs used for categorizing and filtering nodes. They can also be used to attach additional information to nodes or to find/select the required nodes.
Replace `<node_name>` with the actual name of the node you want to target. In the examples, our targeted node is named “my node”.
Pods
Pods are the foundation of Kubernetes workloads. Each Pod contains one or more containers that work together and share storage and network resources. Additionally, the cluster deploys and schedules Pods on nodes, ensuring they run as intended.
- kubectl get po: Retrieves information about all pods in a cluster.
- kubectl describe pod <pod_name>: Provides detailed information about a specific pod, including its current state, events, and associated containers.
- kubectl delete pod <pod_name>: Deletes a specific pod from the cluster, removing it from the desired state. Kubernetes will automatically create a new pod to maintain the desired number of replicas (if applicable).
- kubectl create pod <pod_name>: Creates a new pod using a YAML or JSON file that describes the pod’s configuration and specifications.
- kubectl get pod -n <name_space>: Retrieves information about pods belonging to a specific namespace.
- kubectl create pod <pod_name> -n <name_space>: Creates a new pod within a specific namespace, using a YAML or JSON file that describes the pod’s configuration and specifications.
Replace `<pod_name>` with the actual name of your targeted pod, and `<name_space>` with the desired namespace.
Namespaces
Namespaces division of a Kubernetes cluster into multiple virtual sub-clusters so that multiple teams can work on a cluster at a time.
You can have as many namespaces as required in your Kubernetes cluster, each logically isolated from but able to interact with others in the cluster.
All Kubernetes resources except nodes and persistent volumes exist within designated namespaces, which are created by default or by Kubernetes operators.
- kubectl create namespace <namespace_name>: Creates a new namespace in Kubernetes.
- kubectl get namespace: Retrieves information about all the namespaces in the cluster.
- kubectl describe namespace <namespace_name>: Provides detailed information about a specific namespace, including its labels, annotations, and any resources associated with it.
- kubectl delete namespace <namespace_name>: Used to delete a specific namespace and all the resources within it.
- kubectl edit namespace <namespace_name>: It allows you to modify the configuration of a specific namespace using your default editor.
| Aspect | Default Namespace | Custom Namespaces |
| Resources | Core system pods | Team-specific apps |
| Isolation | None | Logical separation |
| Quota | Unlimited | Resource limits |
Services
Services enable communication between different pods within or outside the cluster. They provide a stable DNS name and IP address for each Pod, enabling them to communicate with one another.
Services ensure a Pod can always find and communicate with the Pod that provides the functionality (e.g., image processing or web services) it requires, even after a previous Pod (and its IP) has been deleted.
- kubectl get services: Retrieves information about all the services running in the cluster.
- kubectl describe services <services_name>: Provides detailed information about a specific service, including its IP address, ports and any associated endpoints.
- kubectl delete services -o wide: Deletes all the services in the cluster. The `-o wide` flag shows additional information about the services being deleted.
- kubectl delete service < service_name>: Deletes a specific service in the cluster.
Deployments
Deployments define the desired state of a set of pods (how they should be created or modified) and manage their lifecycle (when they should be deleted).
They ensure that a specified number of replicas are running, efficiently scale replica pods, can replace existing Deployments and their resources with new ones, and handle application version updates and rollbacks.
Lifecycle Stages Table:
| Stage | Command | Status Check |
| Create | kubectl create -f dep.yaml | kubectl get deploy |
| Update | kubectl set image deploy/mydep nginx=v1.2 | kubectl rollout status |
| Rollback | kubectl rollout undo deploy/mydep | kubectl history |
- kubectl create deployment <deployment_name>: Creates a new deployment in Kubernetes with a specified name.
- kubectl get deployment: Retrieves information about all the deployments running in the cluster.
- kubectl describe deployment <deployment_name>: Provides detailed information about a specific deployment, including the number of replicas, current status, and pods associated with it.
- kubectl delete deployment<deployment_name>: Deletes a specific deployment and all its associated resources, including pods and replicas.
DaemonSets
DaemonSets ensure that a specific pod runs on all or a subset of nodes in the cluster. They ensure that pods are always added to nodes when new nodes are added to clusters.
DaemonSets are used for background tasks or system-level services, such as running cluster storage, log collection, and node-monitoring daemons.
- kubectl get ds: Retrieves information about all the DaemonSets running in the cluster.
- kubectl get ds -all-namespaces: Retrieves information about all the DaemonSets running in all namespaces in the cluster.
- kubectl describe ds [daemonset_name][namespace_name]: Provides detailed information about a specific DaemonSet, including its status, pods, and any associated events.
Events
Events are records of incidents or actions that occur within a cluster. They provide information about the state changes, errors, or warnings related to the cluster.
- kubectl get events: Retrieves information about events occurring in the cluster, such as resource creations, deletions, or errors.
- kubectl get events –field-selector involvedObject.kind != Pod: Filters events based on the involved object kind. In this example, it excludes events related to Pods.
- kubectl get events –field-selector type != Normal: Filter events based on the event type. In this example, it excludes events of type normal.
Logs
Logs capture the output and diagnostic information of events happening in clusters and cluster components. They are essential for debugging and monitoring containers. For instance, you can configure logs to provide step-by-step details of how pod state changes or how schedulers assign Pods to nodes.
✔️For deeper insights on collecting and analyzing logs from your Kubernetes workloads, see our guide on Kubernetes Logging Best Practices.
- kubectl logs <pod_name>: Retrieves the logs from a specific pod.
- kubectl logs –since=1h <pod_name>: Retrieves logs from a specific pod since the provided time duration. In this case, logs from the past hour.
- kubectl logs –tail-20 <pod_name>: Retrieves the last 20 lines of logs from a specific pod.
- kubectl logs -c <container_name> <pod_name>: Retrieves logs from a specific container within a pod. Useful when a pod has multiple containers.
- kubectl logs <pod_name> pod.log: Fetches and saves the logs from a specific pod to a file named “pod.log”.
ReplicaSets
ReplicaSets ensure that a specified number of identical pods (replicas) are running at any given time.
The ReplicaSet configuration ensures that, regardless of the Pods’ ephemeral nature, the preconfigured number of identical pods is always available.
The ReplicaSet has a selector that explains how it should acquire Pods and which Pods to acquire. It also has a Pod template that provides the data to be added to new Pods.
- kubectl get replicasets: Retrieves information about all the ReplicaSets running in the cluster.
- kubectl describe replicasets <replicaset_name>: Provides detailed information about a specific ReplicaSet, including its replicas, pods and any associated events.
- kubectl scale –replace=[x]: Scales the number of replicas in a ReplicaSet to a desired value specified by `[x]`.
This command will scale the number of replicas in the ReplicaSet `my-replicaset` to 3. The ReplicaSet maintains a desired state of 3 pod instances. It creates more when there are fewer, and deletes excess when there are more than 3.
Service Accounts
Service accounts provide an identity for pods and applications within a cluster to interact with other resources, such as APIs or other services. They are used for authentication and authorization in the Kubernetes cluster.
- kubectl get serviceaccounts: Retrieves information about all the service accounts in the cluster.
- kubectl describe serviceaccounts: Provides detailed information about all the service accounts in the cluster, including their secrets and associated resources.
- kubectl replace serviceaccounts: Replaces all existing service accounts in the cluster with the provided or modified configuration.
This command will replace the existing service accounts in the cluster with the new or updated ones specified in the YAML file located at `path/to/serviceaccounts.yaml`. Any existing service accounts not mentioned in the YAML file will be deleted.
- kubectl delete serviceaccounts <name>: This kubectl cheat code deletes a specific service account from the cluster.
For Cluster Introspection
Cluster introspection is the process of examining a cluster and its components, including Pods, nodes, and Deployments. It involves collecting data on their state (e.g., whether the current number of Pods matches the expected number) and performing analyses to gain insights into their health.
📊 Want to visualize your Kubernetes cluster health and metrics beyond basic CLI commands? Check out our comprehensive guide to Kubernetes Monitoring to learn about metrics collection, dashboards, alerts, and more.
- kubectl version: Retrieves the version information of both the `kubectl` client and the Kubernetes server.
- kubectl cluster-info: Provides information about the Kubernetes cluster, including the cluster endpoint, API version, and more.
- kubectl config view: Displays the current `kubectl` configuration, including clusters, users, and contexts.
- kubectl describe node <node_name>: Provides detailed information about a specific node in the cluster, including node status, conditions, capacity, and more.
Interacting with Deployments and Services
This kubectl cheat sheet section involves managing and controlling the lifecycle of applications running within pods and facilitating intra-cluster communication.
- kubectl logs deploy/my-deployment: Retrieves the logs of a specific deployment (`my-deployment` in this example).
- kubectl logs deploy/my-deployment -c my-container: Retrieves the logs of a specific container (`my-container`) within a deployment.
- kubectl port-forward svc/my-service 5000: Sets up port forwarding, allowing you to access a service (`my-service`) in the cluster on local port 5000.
- kubectl port-forward deploy/my-deployment 5000:6000: Sets up port forwarding, allowing you to access a specific pod (`my-deployment`) within a deployment on local port 5000, forwarding to container port 6000.
- kubectl exec deploy/my-deployment — ls: This is used to execute a command (`ls` in this example) inside a specific pod (`my-deployment`) within a deployment. It lists the files and directories present in a given container.
Conclusion
This article is a one-stop kubectl cheat sheet you should keep handy to simplify your K8s operations. Our aim is to make your Kubernetes experience more efficient and seamless.
With this kubectl cheat sheet, you can confidently navigate the complexities of Kubernetes management and unlock its full potential for your containerized applications.
Which of these commands will you immediately use right away?
FAQs
What is the Kubectl syntax structure?
kubectl [command] [TYPE] [NAME] [flags]. TYPE case-insensitive, NAME case-sensitive. Ex: kubectl get pods -n dev.
Command to list all namespace resources?
kubectl get all -n myns or -A (all namespaces). Filter: -l app=web.
How to Debug failing pod?
describe pod → logs –tail=20 → events –field-selector name=mypod.
What is Deployments vs ReplicaSets?
Deployments manage ReplicaSets (rolling updates, scaling, rollbacks). ReplicaSets maintain exact pod replicas via selectors. Use Deployments for apps (kubectl create deploy), RS rarely directly.
How to access the local service?
Port-forward: kubectl port-forward svc/mysvc 8080:80 (service) or kubectl port-forward pod/mypod 8080:3000 (pod). Exec inside: kubectl exec -it deploy/myapp — bash. Perfect for dev testing.