When you see exit code 143 and your container stops, the instinct is to assume something broke. In most cases, the container received a shutdown signal and exited on its own. What matters is whether your application handled that signal correctly.
In production, how your application handles that shutdown determines whether users see dropped requests, timeouts, or clean transitions during deployments and scaling events. The same exit code can either be a normal rollout signal or the first sign of instability.
This guide breaks down what exit code 143 actually means in Kubernetes and Docker, when it’s expected, and how to investigate it when it isn’t. We’ll walk through the termination flow, show how to identify real issues, and cover how to make your services shut down cleanly under load.
What is exit code 143?
Exit code 143 means a container received a SIGTERM signal and exited because of it. In Linux systems, when a process exits due to a signal, the exit code is calculated as 128 plus the signal number. SIGTERM is signal 15, so 128 + 15 = 143.
This is not a crash; it’s a termination request. SIGTERM gives the process time to handle any necessary cleanup before exiting, which is why exit code 143 is considered a graceful shutdown.
You will see exit code 143 in Kubernetes during rolling updates, scale-downs, and node drains, and in Docker when you run `docker stop`.
What is the difference between exit code 143 (SIGTERM) and 137 (SIGKILL)?
Exit code 137 means the container was force-killed. Unlike SIGTERM, SIGKILL gives the process no chance to respond. The kernel terminates it immediately, no cleanup, no connection draining, nothing.
The two codes are part of the same termination sequence. When Kubernetes terminates a pod, it sends SIGTERM first and starts the `terminationGracePeriodSeconds` timer. If the container exits before the timer runs out, you get 143. If it doesn’t, Kubernetes sends SIGKILL and the container exits with 137.
In production, 143 usually means a clean shutdown. But when you see 143 followed by 137 for the same container, it means the app didn’t exit in time after receiving SIGTERM and was forced-killed.
🔍 Monitor container terminations in real time — Start your Middleware trial
Why does exit code 143 happen
Kubernetes exit code 143 is generated when Kubernetes or Docker sends a SIGTERM signal to a container, and the container exits in response. It appears across deployments, scale-downs, node drains, and manual restarts.
What are the common triggers for exit code 143?
Exit code 143 has two categories of triggers: those that are part of normal Kubernetes operations and those that indicate resource or infrastructure problems.
Expected:
- Deployment rollouts: Kubernetes terminates old pods to replace them with the new version
- Scale-downs: Kubernetes picks pods to remove and sends SIGTERM to each one
- Node drains: every pod on that node gets terminated before the node goes offline
- Manual restarts via `kubectl rollout restart` or `docker stop`
- CI/CD pipelines that tear down containers after a job completes
Worth investigating:
- Pod eviction when a node runs low on memory or CPU
- Cluster autoscaling is removing nodes that still have running pods
- Node instability or unexpected infrastructure changes
If you’re running on EKS, see our EKS monitoring guide for cluster autoscaling-specific patterns.
How does the Kubernetes pod termination flow work?
Once Kubernetes decides to terminate a pod, it follows a particular sequence. It marks the pod as “Terminating” and removes it from the service endpoints, so no new traffic gets routed to it. If a `preStop` hook is configured, it runs at this point. Then Kubernetes sends SIGTERM to PID 1 inside the container and starts the `terminationGracePeriodSeconds` countdown, which is 30 seconds by default.
During that period, the application is expected to stop accepting new requests, finish any in-flight work, close database connections, and exit cleanly. If it does all that before the timer runs out, the container exits with code 143. If the process is still running when the grace period expires, Kubernetes forces the container to stop.
How to identify exit code 143 in production
Exit code 143 shows up in pod status, container inspect output, and your observability stack.
How to identify exit code 143 in Kubernetes?
In Kubernetes, exit code 143 appears in the pod’s Last State block and the Events section of kubectl describe output, and a few commands get you most of what you need.
Start with a broad look at the pod state:
kubectl get pods | grep -E "Completed|Error|Terminating"If you see a pod in `CrashLoopBackOff` or notice the restart count keeps going up, pull the full details for that pod:
kubectl describe pod <pod-name>In the output, check the `Last State` block under `Containers`. You should see `Exit Code: 143`, the `Reason` field (either `Completed` or `Error`), and the `Events` section at the bottom, which tells you what actually triggered the termination. A deployment trigger looks different from an eviction, and the difference shows up in the events section.
If the events section doesn’t give you enough context, go deeper:
# Check if eviction triggered the termination
kubectl get events --field-selector involvedObject.name=<pod-name>

# Correlate with deployment history
kubectl rollout history deployment/<name>

# Check for resource pressure on the node
kubectl top nodes
kubectl top pods
The rollout history is useful when you’re not sure whether a restart lines up with a deployment. The resource commands indicate whether the node was under pressure at the time of termination.
Dealing with CrashLoopBackOff on top of exit code 143? Here’s how to fix common Kubernetes errors.
How to Identify Exit Code 143 in Docker?
Docker keeps all exit code information in the container state, and you can pull it even after the container has stopped. Start by listing all exited containers:
docker ps -a --filter "status=exited"The output lists all stopped containers with their exit codes:
CONTAINER ID   IMAGE    COMMAND                  CREATED        STATUS                      NAMES
c127964c7589   ubuntu   "bash -c 'trap 'exit..." 5 minutes ago  Exited (143) 5 minutes ago  test-143
Then inspect the specific container you want to check:
docker inspect <container-id> | jq '.[0].State'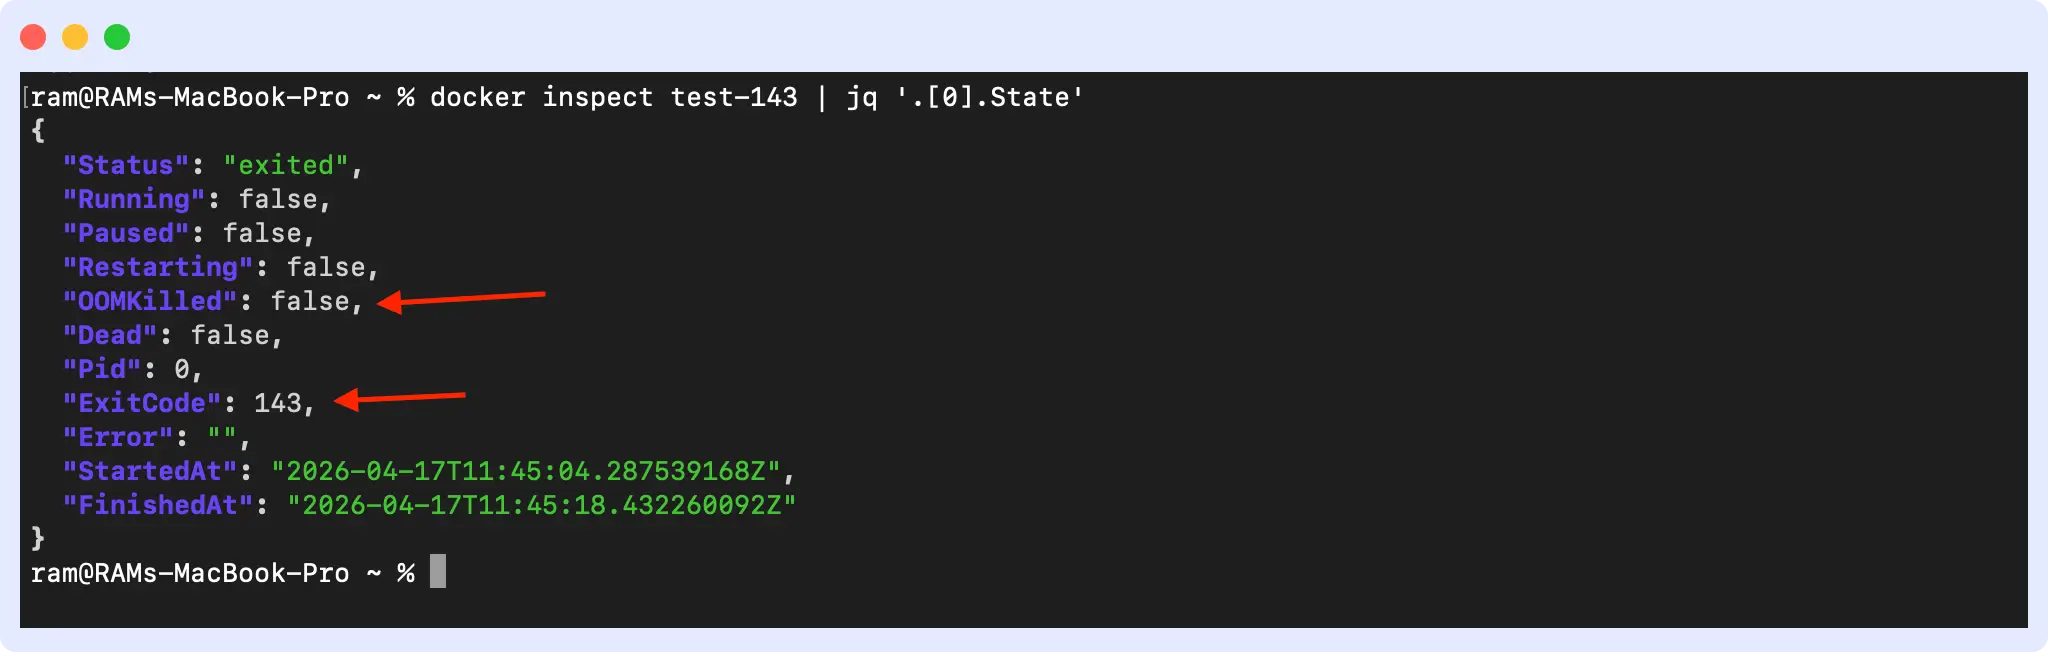
In the output, look for three things. First, `ExitCode: 143` confirms the container exited via SIGTERM. Second, `OOMKilled: false` tells you memory was not the cause; if this is true, the container was killed by the kernel before SIGTERM even ran. Third, the `FinishedAt` timestamp gives you a reference point to correlate with your logs and metrics.
How to identify exit code 143 in your observability stack?
Tracking exit code 143 across pods and correlating it with resource usage and restart patterns helps distinguish normal deployment activity from resource or infrastructure problems. Individual exit codes tell you a container stopped. Patterns across pods, correlated with latency and error rates, tell you whether those stops are causing real user impact. The metrics and dashboard setup are covered in the monitoring section below.
How to debug and monitor exit code 143
Debugging exit code 143 involves identifying the trigger, inspecting logs, verifying shutdown timing, and correlating with metrics. The commands below help you work through each step.
Step-by-step investigation of exit code 143
Debugging exit code 143 means finding what sent SIGTERM, whether the app handled it correctly, and whether any user-facing impact occurred.
1. Identify the trigger
Check recent deployment activity and pod events first. If a deployment lines up with the restart time, you likely don’t need to go further.
# Check recent deployment activity
kubectl rollout history deployment/<name>

# Check events for eviction or resource signals
kubectl get events --sort-by='.lastTimestamp' | grep <pod-name>

# Check node conditions
kubectl describe node <node-name>
2. Inspect logs during the shutdown window
Pull the logs from the terminated container and look for any shutdown activity. A healthy shutdown usually logs something. An unhealthy one either logs nothing or cuts off mid-output.
# Get logs from the terminated container
kubectl logs <pod-name> --previous
Look for logs indicating graceful shutdown, such as “Received SIGTERM, draining connections…” An absence of shutdown logs or an abrupt cutoff mid-output usually means the app did not handle SIGTERM. If the pod logs don’t show anything useful, check the host node’s system logs at `/var/log/syslog` and grep for SIGTERM or `terminated` to see if the signal was triggered at the OS level.
Learn how to tail and filter Kubernetes logs effectively.
3. Verify shutdown timing
Compare your app’s actual shutdown time against your `terminationGracePeriodSeconds` setting. If the difference is close, that is where to start when you see the 143 to 137 pattern.
4. Check the readiness probe timing
When Kubernetes removes a pod from the service endpoints, existing connections don’t close immediately. If connections are dropping during shutdown, see the preStop hook configuration in the fixing section below.
5. Correlate with metrics
Cross-reference the termination timestamp with your request error rates, P99 latency, active connection count, and in-flight request duration. A termination that doesn’t move any of those numbers is clean. One that spikes your error rate or latency during the shutdown window means requests are getting dropped.
What metrics should you monitor for exit code 143?
Monitoring exit code 143 means tracking the metrics that show whether a container termination was clean or caused real user impact.
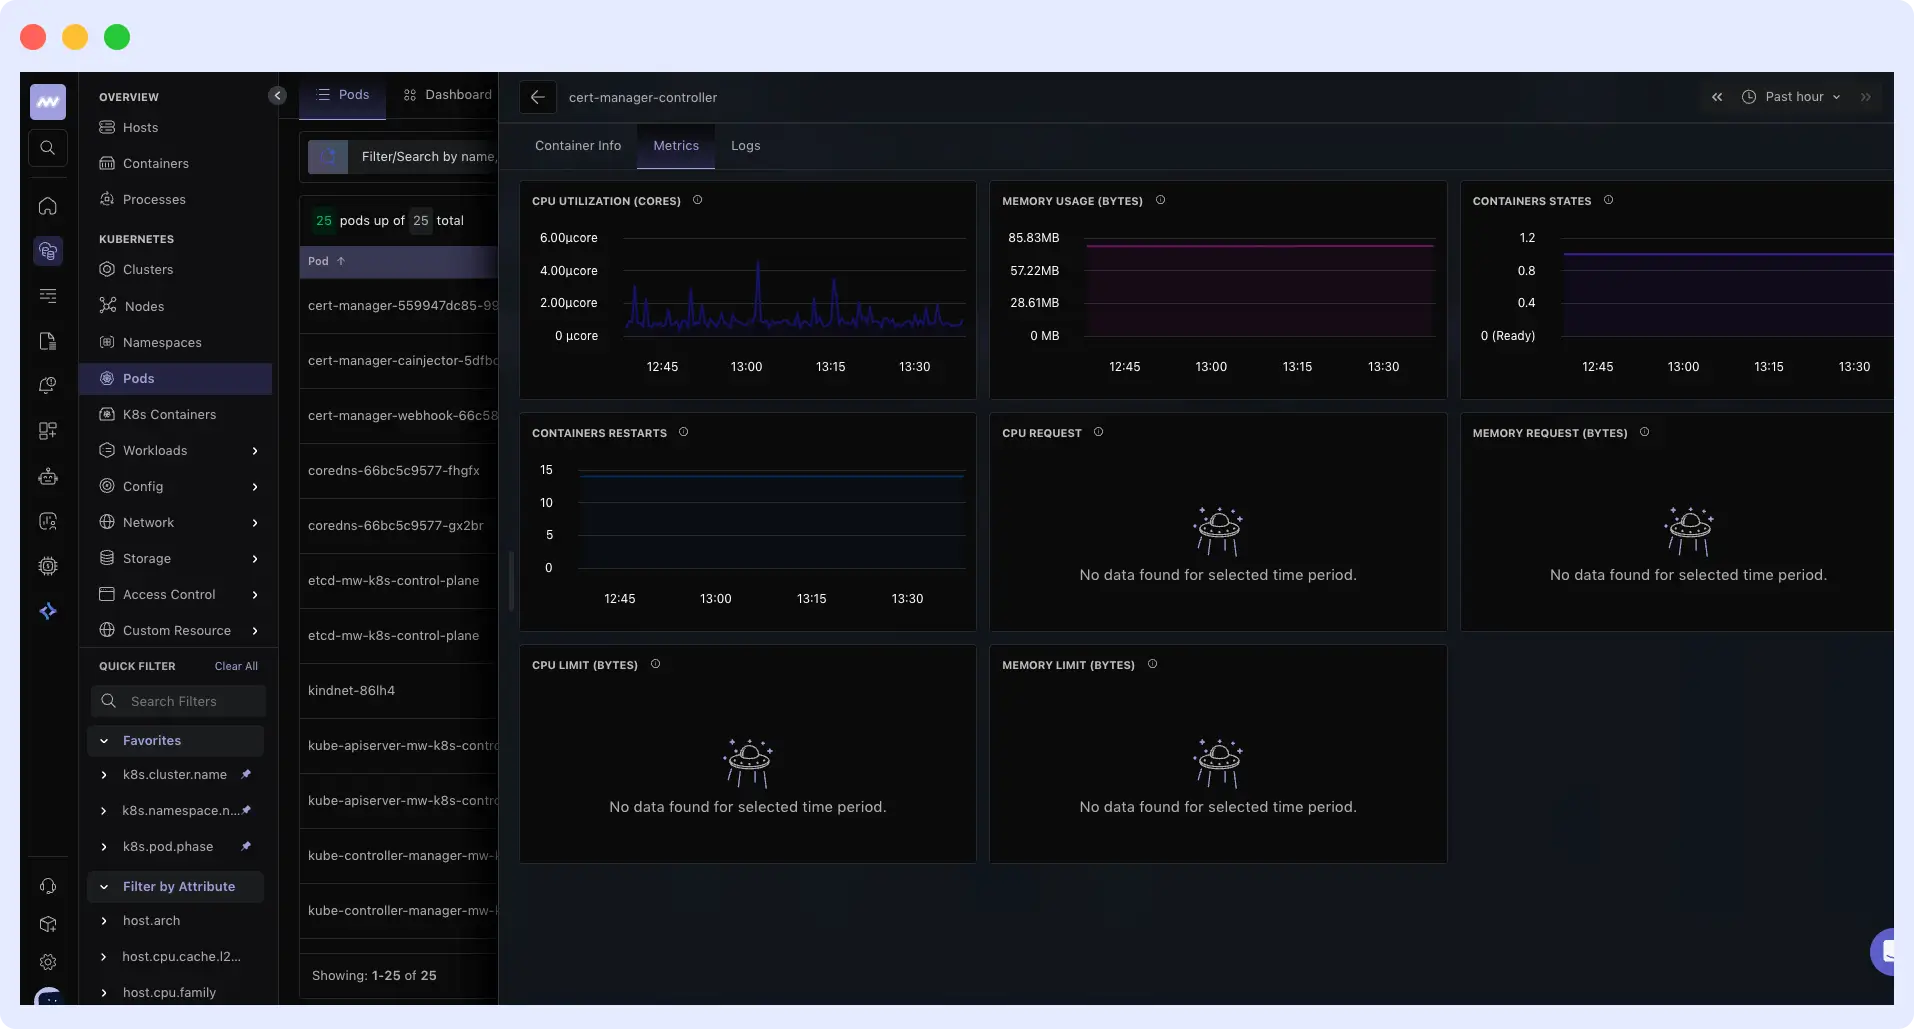
- Restart count per pod: A steady baseline is normal. A sudden spike outside of deployment windows needs attention.
- Container states over time: The container states graph shows when a pod moves in and out of a ready state. If a pod is taking too long to become healthy after a restart, it shows up here.
- CPU and memory usage per pod: Resource pressure is one of the most common unexpected triggers for exit code 143. Tracking CPU and memory alongside restart count helps you tell the difference between a pod terminated by a deployment and one evicted because the node ran out of resources.
Beyond the individual metrics, there are two patterns worth watching closely. Frequent 143 spikes outside of deployment windows usually point to resource pressure or node instability. The 143 followed by 137 pattern means the grace period is too short for your app’s actual shutdown time.
Middleware tracks all of these metrics with pre-built Kubernetes dashboards. Explore Middleware Kubernetes Monitoring
How do you fix exit code 143 issues?
You fix exit code 143 issues by updating your Kubernetes configuration and making sure your application handles SIGTERM correctly. When both are set up right, your containers shut down cleanly without dropping requests or escalating to exit code 137.
How to configure Kubernetes for graceful shutdowns?
Kubernetes provides three settings that control how a pod handles termination: `terminationGracePeriodSeconds`, the `preStop` hook, and readiness probes.
1. `terminationGracePeriodSeconds`
This setting controls how long Kubernetes waits for your container to exit after sending SIGTERM. The default is 30 seconds, and that is often not enough for applications handling long-running requests. A good starting point is twice your P95 request duration plus your connection drain time. Don’t set it to 5 minutes just to be safe.
spec:
  terminationGracePeriodSeconds: 60
2. `preStop` hook
The `preStop` hook runs before Kubernetes sends SIGTERM to your container. Without it, your pods can receive SIGTERM while it’s still getting new traffic, because endpoint removal takes time to move through kube-proxy and your ingress controller. A short sleep gives that propagation time to finish before your app starts shutting down.
lifecycle:
  preStop:
    exec:
      command: ["/bin/sh", "-c", "sleep 15"]
A sleep of 10 to 20 seconds covers most setups. Adjust based on how long your ingress takes to stop routing traffic to the pod.
3. Readiness probe
Your readiness probe controls when the pod stops receiving new traffic. When your app receives SIGTERM, it should immediately start failing the readiness check. That pulls it out of the load balancer rotation faster and reduces the window where new requests can land on a terminating pod.
readinessProbe:
  httpGet:
    path: /healthz
    port: 8080
  periodSeconds: 5
How should your application handle shutdowns?
Before anything else, make sure your application runs as PID 1 inside the container. If it runs as a child process of a shell script, it will never receive SIGTERM directly, and your shutdown handler will never execute. In your Dockerfile, use the exec form for CMD or ENTRYPOINT to ensure your app is PID 1. If you can’t modify the application or the Dockerfile, add tini as an init process. It runs as PID 1 and correctly forwards SIGTERM to your app.
Once that’s confirmed, your application needs to catch SIGTERM and handle it in a specific order. First, stop accepting new requests by closing the server listener or returning 503. Then finish any requests that are already in flight. After that, close external connections cleanly: databases, message queues, and caches. Write out any pending writes, logs, or metrics before the process exits. The whole sequence needs to be completed within your grace period, or Kubernetes will send SIGKILL and cut it short.
For example, in a Node.js app:
process.on('SIGTERM', () => {
  console.log('SIGTERM received, draining connections');

  server.close(() => {
    console.log('Server closed, exiting');
    process.exit(0);
  });

  // Force exit if connections don't drain within grace period
  setTimeout(() => {
    console.log('Forcing exit after timeout');
    process.exit(1);
  }, 25000);
});
When SIGTERM arrives, `server.close()` stops the server from accepting new requests and waits for active connections to finish. Once they do, the process exits with code 0.
Common mistakes that break graceful shutdowns
These are the common mistakes that cause shutdown problems in production.
- Ignoring SIGTERM entirely: If your app doesn’t catch the signal, it won’t do any cleanup before the grace period expires. Kubernetes sends SIGKILL, the container exits with 137, and any open connections get dropped.
- Blocking shutdown with long background tasks: If your shutdown handler waits for a long-running background job to finish, it will likely exceed the grace period. Kubernetes sends SIGKILL before the job completes, which can cause data loss. Keep shutdown logic short and focused.
- Missing `preStop` hook or readiness probe handling: Without these, new requests can hit your pod while it’s already shutting down. Users see errors, and the pod takes longer to terminate cleanly.
- Worker processes not coordinating shutdown: In multi-process applications, the main process can exit before workers finish their work. Some workers end up getting forced-killed, which leaves your application in an inconsistent state.
- Database connection pool not draining: Closing connections abruptly instead of letting active transactions finish can cause rollbacks and partial writes. Your shutdown handler should wait for the connection pool to drain before the process exits.
Most of these mistakes produce the same result: an exit code 143 that looks clean but leaves users seeing errors.
Common exit code 143 scenarios and what they mean
Here are common exit code 143 scenarios and what they mean in production.
1. What does it mean when the grace period is set, but the container still exists with 137?
When the grace period is set but the container still exists with 137, it means the app received SIGTERM, but something in the shutdown process blocked it from exiting in time, so Kubernetes sent SIGKILL to force it to exit. Add logging to your shutdown handler to see exactly where it stops. The block is usually a slow database query, a background job that won’t finish, or a connection that never closes.
2. Why do users see 502s during deployments, even with a clean exit code 143?
Users see 502s during deployments because traffic continues to reach the pod while it shuts down. The pod gets removed from the service endpoints, but kube-proxy and your ingress controller take a few seconds to catch up, so new requests keep landing on a terminating pod during that window. Adding `preStop: sleep 15` delays SIGTERM long enough for endpoint removal to finish moving through the system.
3. What does it mean when Pod events show both 143 and OOMKilled?
When pod events show both 143 and OOMKilled, it means the pod hit its memory limit first, which triggered an OOMKilled, and then Kubernetes terminated the pod, resulting in exit code 143. The 143 did not cause the OOMKill. The fix is to increase the memory limit for that pod, not to change anything about the shutdown configuration.
Getting an OOMKilled error alongside exit code 143? Learn how to troubleshoot it with Middleware.
4. Why do connections still drop even when the preStop hook runs?
Connections drop even when the `preStop` hook runs because the `terminationGracePeriodSeconds` timer starts at the same time the hook begins, not after it completes. If the hook runs too long, it eats into the time your app has to shut down cleanly, leaving active connections with no time to drain before Kubernetes sends SIGKILL.
If your hook runs but connections still drop, the sleep is likely too short or your grace period doesn’t leave enough time for both the hook and the shutdown to finish. Increase the sleep to 15 or 20 seconds and make sure your grace period covers the hook duration plus your app’s actual shutdown time.
Monitoring exit code 143 with Middleware
Middleware is an observability platform that provides full visibility into your infrastructure, including pod-level container termination patterns. When exit code 143 appears in your cluster, Middleware provides context to determine whether it was a routine deployment or something worth investigating.
Middleware tracks `k8s.container.restarts` explicitly at the container level, so you can see restart count, container states, and CPU and memory usage in one view. That combination lets you tell the difference between a pod terminated by a rolling update and one evicted because the node ran out of resources.
You can also set alerts for restart spikes outside deployment windows, so abnormal termination patterns surface before users start seeing errors.
✅ Stop guessing why pods restart. Get full container visibility with Middleware
Conclusion: Understanding exit code 143
Kubernetes exit code 143 is normal. In most cases, it means Kubernetes is working exactly as designed. But a clean exit code does not always mean requests were handled properly before the container stopped.
If you are consistently seeing the 143 to 137 pattern, your grace period or shutdown logic needs work.
See exit code 143 before users do. Middleware surfaces restart spikes, grace period violations, and resource pressure across your Kubernetes cluster — in real time. Start Free Trial | Book a Demo
FAQs
Why do I see exit code 143 but still get connection errors during deployment?
Kubernetes removes the pod from service endpoints, but kube-proxy and your ingress controller take 5 to 15 seconds to stop routing traffic. New requests can hit your terminating pod during that window. Add a `preStop` hook with `sleep 10-15` to delay SIGTERM until that propagation finishes.
Should I increase `terminationGracePeriodSeconds` or fix my app?
Both. Set the grace period to twice your P95 request duration plus connection drain time. Also, make sure your app handles SIGTERM and exits on time. A 300-second grace period hiding a broken shutdown handler is worse than a 30-second one that fails fast.
How do I know if my preStop hook is actually working?
Add logging to your `preStop` script and check pod logs during termination. The `preStop` logs should appear before your app’s SIGTERM logs. If you see nothing, the hook is not running; check your YAML syntax.
Can I prevent exit code 143 entirely?
No, and you shouldn’t try. Kubernetes exit code 143 signals a graceful shutdown. Focus on making it truly graceful: handle SIGTERM, drain connections, and make sure users see no impact during restarts.
Why does my pod get exit code 143 during deployments, even with `maxUnavailable: 0`?
Once new pods pass their readiness checks, old pods get SIGTERM as part of the rolling update. That’s expected. If you’re seeing errors, the issue is in how the old pod shuts down, not in the fact that it’s shutting down.
What is the difference between a pod eviction and a normal termination?
Both produce exit code 143. Check `kubectl describe pod` events:
- Normal termination: `Reason: Completed` or a deployment-triggered event
- Eviction: `Reason: Evicted`, usually with a message about low memory or disk pressure
Evictions point to resource pressure and need a separate investigation.
How do I check Docker exit code 143?
Run docker inspect <container-id> | jq ‘.[0].State’ and check the ExitCode field. A value of 143 means the container received SIGTERM and exited cleanly. Also check OOMKilled: if it’s true, memory pressure killed the container before SIGTERM ran.